Share your VHF feed with us!
Sharing Airband Feed
If you have a device monitoring VHF you can now share your feed with us and get a FREE upgrade to a Business Account!
Just follow these steps:
Sign in to your RadarBox account
In order to start sharing your VHF data with us, you need to be logged in. If you don't have a RadarBox account, you can create one for free.
Generate a Serial Key
Once you're logged in you will need to generate a serial key. This key identifies your feed and serves as the mounting point to our IceCast server.
Each installation should have a unique serial key.
BEFORE PROCEEDING, MAKE SURE THE LAWS OF YOUR COUNTRY ALLOW YOU TO PUBLICLY SHARE THIS DATA!
Setup your device
We provide instructions for two different methods of sharing your feed with us, but as long as you're able to stream to an IceCast Server you should be able to use any method you like.
Raspberry Pi (click to expand)
We recommend using the RTLSDR-Airband software with your Raspberry Pi device.
For conveniency, we created a package rtl-airband-rb that will install the necessary software if you already have or plan to have our RBFeeder software installed.
If you're already sharing ADS-B data with us, you can install our rtl-airband-rb package with the following commands:
sudo apt-get update -y && sudo apt-get install rtl-airband-rb -yIf you don't have RBFeeder installed, the following command will install both RBFeeder and the rtl-airband-rb package:
sudo bash -c "$(wget -O - http://apt.rb24.com/inst_rtl-airband-rb.sh)"In either case, the RTL-Airband configuration file should be at /etc/rtl-airband-rb.conf
If you already have an RTL-Airband installation (if you are feeding to LiveATC for example), then you just need to edit the configuration file.
Then using the generated serial as the mountpoint and your RadarBox credentials for the username and password fields, add an entry to your monitoring channel's output in the RTL-Airband configuration file. Please refer to the RTL-Airband User Manual for additional information on how to configure your device.
Example:
pidfile = "/run/rtl_airband.pid";
devices = (
  {
      // Set device to scanning mode if you are scanning multiple frequencies
      mode = "scan";
      ...
      channels = (
        {
          // Set the frequency you are scanning
          freq = 123000000;
          // Or if you are in scanning multiple frequencies
          freqs = ( 123000000, 123500000 );
        ...
        outputs = (
          // Example configuration for RadarBox
          {
            disable = false;
            type = "icecast";
            server = "audio.rb24.com";
            port = 8000;
            mountpoint = "EXTVHFXXXXXX";
            username = "[email protected]";
            password = "*********";
            name = "My Transmitter";
            genre = "ATC";
            send_scan_freq_tags = true;
          },
          // Example configuration for LiveATC
          {
            disable = false;
            type = "icecast";
            server = "audio-in.liveatc.net";
            port = 8010;
            mountpoint = "XXXXXXX;
            username = "XXXXXX";
            password = "XXXXXX";
            name = "My Transmitter";
            genre = "ATC";
            send_scan_freq_tags = true;
          }
        );
      }
    );
  }
);
Windows PC (click to expand)
For conveniency, we created a package rtl-airband-rb that will install the necessary software if you already have or plan to have our RBFeeder software installed.
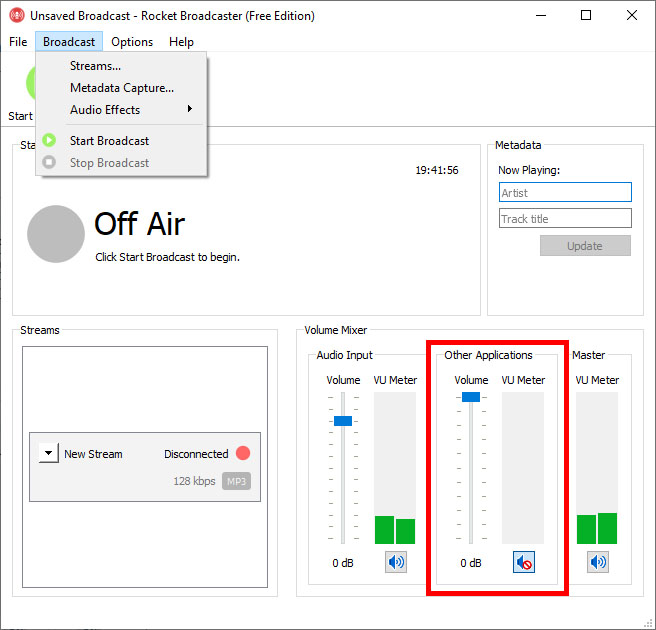
Don't forget to turn off audio from "Other Applications" to ensure no other sounds from your PC are broadcast to RadarBox.
Check station and wait for approval
Once you've setup and started broadcasting, you can head over to your VHF station page at https://www.radarbox.com/stations/EXTVHFXXXXXX, where you can define your station's location and listen to your audio feed.
After your station is approved, this page will become visible to other users. All done!


